Easy Under Sink Cabinet Bottom Replacement Tips
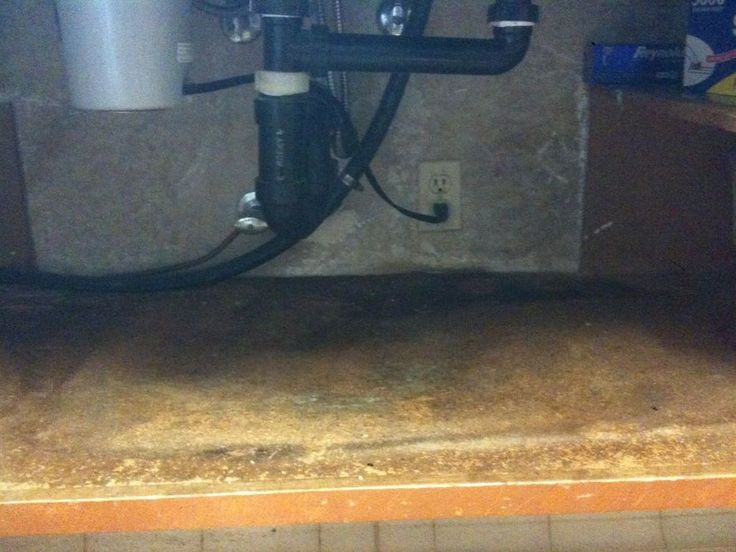
Leaking pipes, persistent humidity, and general wear and tear often manifest first under a sink, making the cabinet bottom one of the most vulnerable zones in your kitchen or bathroom. When water intrusion begins, the particleboard or MDF core of a standard cabinet base can swell, warp, and ultimately fail, creating an unsightly hazard and compromising the structural integrity of the entire unit. Addressing this specific failure point requires a targeted strategy that goes beyond simple painting or surface sealing.
Diagnosing the Core Problem
The first step in a successful repair is a precise diagnosis of the damage. You need to determine the full extent of the deterioration before purchasing materials or replacing anything. Often, what appears to be a minor water stain is actually the beginning of a much larger soft spot where the wood fibers have broken down.
Assessing the Damage Scope
To effectively evaluate the cabinet bottom, you should conduct a thorough inspection using a methodical approach. Check for flexibility by pressing down on the wood; if it gives significantly or feels spongy, the core integrity is lost. Look for discoloration that spreads beyond the edges of a leak source, which indicates that the moisture has traveled laterally through the material. Finally, verify that the damage has not reached the point where the cabinet floor is touching the under-sink plumbing, which could cause rust or further restrict access.


| Damage Level | Visual Cue | Structural Integrity |
|---|---|---|
| Minor | Surface water stain or slight softness | Intact, but requires monitoring |
| Moderate | Bubbling finish, persistent dampness | Weakened; may flex under pressure |
| Severe | Sagging, crumbling, or actual holes | Compromised; immediate replacement advised |
Material Selection for Replacement
Not all under-sink cabinet bottoms are created equal, and choosing the right material is the difference between a temporary fix and a permanent solution. While appearance matters, the priority here is chemical and water resistance, as this area is consistently exposed to humidity and potential splashes.
Evaluating Replacement Options
For most modern replacements, a thermally fused laminate (TFL) panel or a high-grade plywood with a moisture-resistant core is recommended. These materials resist swelling better than solid wood and are usually thin enough to maintain the existing cabinet dimensions. If the cabinet is in a high-humidity zone like a bathroom, consider marine-grade plywood or a PVC-coated board, as these materials offer the highest resistance to prolonged moisture exposure.


The Replacement Process Step-by-Step
Once you have confirmed the damage and acquired the correct material, the replacement process is straightforward. The goal is to remove the compromised section without disturbing the rest of the cabinet structure, ensuring a perfect fit for the new panel.
Execution and Refinishing
Start by removing the cabinet door and drawers to provide ample workspace. Carefully measure the interior cavity, accounting for any trim or molding that might affect the fit. Cut the new bottom panel to size with a precision tool, ensuring the edges are perfectly square. Secure the new bottom with corrosion-resistant screws rather than nails, as screws provide better long-term hold in dense materials. Finally, if the cabinet interior is visible, apply a coat of water-based polyurethane to seal the raw edges and ensure the repair blends seamlessly with the original finish.
Proactive Protection Strategies
After investing time in replacing the under sink cabinet bottom, it is wise to implement measures to prevent a recurrence. Water management under the sink is often the weakest link in household maintenance, but it is also the easiest to control with the right accessories.


Long-Term Safeguards
Installing a small plastic drip tray or a leak detection mat provides an immediate buffer against accidental spills and hidden condensation. Furthermore, you should inspect the space bi-annually to ensure that pipes are not rubbing against the wood and that the cabinet ventilation is adequate. By treating the bottom of the cabinet as a critical maintenance zone rather than an afterthought, you significantly extend the life of the entire unit.
When to Call a Professional
While replacing the cabinet bottom is a manageable DIY project, certain scenarios indicate that you should consult a specialist. If the damage is accompanied by significant sagging in the cabinet frame or if the leak originates from within a wall cavity rather than a pipe joint, the structural implications may be beyond a simple repair.
Identifying Complex Issues
A professional contractor can assess whether the load-bearing supports are compromised or if the moisture issue is a symptom of a larger plumbing leak. If the cabinet bottom needs to be replaced but the surrounding drywall and flooring are also saturated, a contractor will ensure that the entire affected area is addressed uniformly, preventing patchy repairs that fail prematurely.


Related Articles

Space-Saving Sliding Cabinet Trash Can: Under Sink Organizer with Odor-Proof Seal
In the quiet battle for kitchen order, few adversaries are as stubborn as clutter. Counter space is a premium, and the relentless tide of packaging, peels, and...

How to Replace a Pool Timer: Cost Estimates & DIY Tips
When your pool's timing system starts to falter, the rhythm of your entire maintenance routine is thrown off. Replacing the internal timer is often the most...

How to Replace a Sink Stopper: Easy Step-by-Step Guide
Few household issues are as frustrating and disruptive as a sink stopper that refuses to function. A stuck or broken stopper transforms a simple washing task...

Under Cabinet Lighting Ideas: Bright, Easy & Stylish Transformations
Under cabinet lighting is one of the most effective ways to transform the functionality and ambiance of a kitchen. Often overlooked, this layer of illumination...

How to Replace Bathroom Sink Drain Pipe: Easy Step-by-Step Guide
Few home maintenance tasks are as simultaneously daunting and rewarding as learning how to replace bathroom sink drain pipe. A dripping pipe or a persistent...

How to Replace Pipes Under Sink: A Step-by-Step Guide
Pipes under a sink might be small, but when they fail, they create a big mess. Leaks beneath the vanity or cabinet lead to water damage, unpleasant odors, and...