Refinish Outdoor Furniture: Revive Your Patio With Stunning New Look
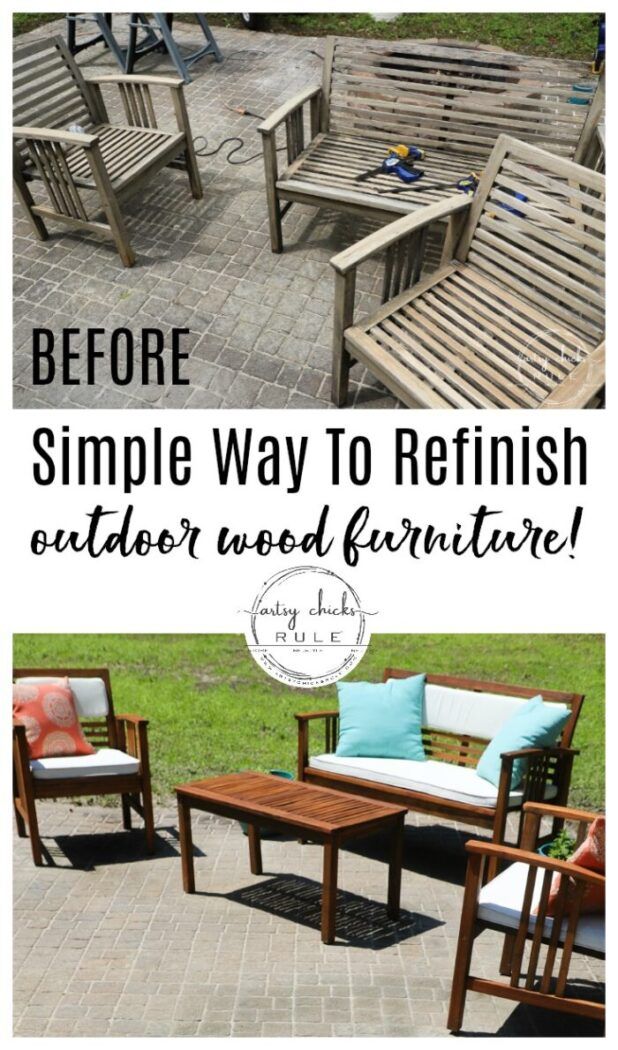
Reviving tired, weathered patio sets is one of the most cost-effective ways to refresh an outdoor living space. Whether the piece is a classic Adirondack chair or a sturdy aluminum frame wrapped in faded fabric, the process transforms neglected assets into vibrant centerpieces for summer gatherings. This guide provides the technical knowledge and practical steps required for a professional-grade refinish outdoor furniture project.
Assessing the Condition of Your Furniture
Before reaching for a paintbrush, a thorough assessment determines the scope of the project. The material—whether it is powder-coated metal, solid wood, or synthetic wicker—dictates the entire approach. Skipping this step often leads to peeling paint or a finish that fails prematurely.
Inspecting Metal Frames
For metal furniture, check for surface rust. Light surface rust can be sanded away, but deep pitting or flaking metal indicates structural compromise that may require welding or replacement. Look for intact powder coating; if the finish is cracked and chipped, a complete strip-down to bare metal is necessary for a durable bond.


Evaluating Wood and Wicker
Wooden pieces require checking for rot, splits, and loose joints. Pressure-treated lumber is durable but often requires specific primers to prevent tannin bleed-through, which stains lighter topcoats. Wicker and rattan need gentle cleaning rather than aggressive sanding to avoid damaging the fibers.
The Preparation Phase: The Key to Longevity
The success of any refinish outdoor furniture project hinges entirely on preparation. An improperly cleaned or inadequately sanded surface will cause new paint or stain to flake off, regardless of the product quality. This stage is non-negotiable for a high-end, long-lasting result.


- Cleaning: Use a specialized degreaser or oxygen bleach solution to remove mold, mildew, and environmental grime. A pressure washer can be effective for hardscaped areas, but wood should be air-dried for 48 to 72 hours post-washing to stabilize the fibers.
- Sanding: The goal is to create a rough texture for the new finish to grip. Start with 80-grit paper to remove the old gloss, and finish with 220-grit for a smooth profile. Always move in the direction of the wood grain to avoid scratches.
- Repair: Fill nail holes and cracks in wood with a high-quality epoxy or cellulose filler. Tighten hardware and replace any wicker slats that have broken away during the winter months.
Choosing the Right Finish
Selecting the correct product is the most critical decision in the refinish outdoor furniture journey. The market offers solutions for every material, but understanding the difference ensures you buy once and finish well.
| Material | Recommended Finish Type | Key Benefit |
|---|---|---|
| Metal (Steel/Iron) | Rust-inhibiting primer + Exterior enamel | Durability against temperature fluctuations |
| Wood (Hardwoods) | Oil-based stain or UV-resistant semi-gloss paint | Penetrates fibers to repel moisture |
| Synthetic/Wicker | Heavy-duty exterior spray paint | Flexibility to withstand bending without cracking |
For wooden furniture, consider the aesthetic goal. A transparent oil finish preserves the natural grain while providing water resistance, whereas a solid-color paint offers maximum UV protection and hides imperfections.
Application Techniques for a Flawless Look
Even the best product will look amateurish if applied incorrectly. Mastering the brushstroke and environmental conditions separates a DIY project from a professional makeover.


Weather and Timing
Humidity is the enemy of a smooth finish. Aim for a dry day with low humidity levels. Avoid staining or painting in direct sunlight, as the product will dry too quickly, leaving visible lap marks and brush strokes.
Layering for Depth
Whether using stain or paint, thin coats are superior to thick ones. Apply the first coat conservatively, allowing it to cure fully before applying the second. This layering technique builds depth and prevents drips from forming on vertical surfaces like chair backs.
Protecting the Investment
Once the final coat has cured, the job is only half-finished. Furniture lives outdoors, subject to constant assault from UV rays and seasonal weather. Without a protective sealant, even the most beautiful refinish will fade and deteriorate within a season.


For wood, a spar urethane or marine-grade varnish provides a tough, water-repellent barrier. For metal, a clear coat sealant locks in the color and prevents oxidation. Reapply this protective layer annually as part of routine maintenance to extend the life of the furniture significantly.
Seasonal Maintenance Routines
A refinish outdoor furniture strategy does not end with the last coat of paint. Proper care through the seasons ensures the investment pays off for years. Establishing a simple routine prevents the massive cleanup required during a major project.
- Spring: Inspect for winter damage. Clean with mild soap and reapply sealant if water beading is no longer present on the surface.
- Winter: Move fabric cushions indoors or cover the entire piece with a breathable, UV-resistant cover to prevent fabric fading and metal rusting.
By treating the furniture with care year-round, the refinished surface remains vibrant, reducing the need for intensive restoration work in the future.
Related Articles

Cabinet Gloss Finish: Transform Your Look with 10 Stunning Ideas
When it comes to transforming the look and feel of your kitchen or bathroom, the cabinet finish is the single most impactful decision you will make. A gloss...

Transform Your Outdoor Space with the Best Electric Patio Awning
Transforming your outdoor space begins with the simple decision to install an electric patio awning. This intelligent solution offers more than just shade; it...

Stunning Patio Home House Plans For Your Dream Outdoor Living
For the modern homeowner seeking a balance between efficient living and seamless indoor-outdoor connectivity, a patio home house plan presents a compelling...

Stunning Patio Furniture Images for Outdoor Inspiration
High-quality patio furniture images are the cornerstone of any successful outdoor living brand. In a market driven by visual inspiration, these photographs do...

Rustic Charm: Stunning Pallet Wood Patio Furniture for Outdoor Living
For homeowners seeking to blend rustic character with outdoor durability, pallet wood patio furniture presents an irresistible opportunity. Sourced from sturdy...

Steps to Refinish a Deck: Your Complete Guide to a Stunning Outdoor Makeover
Refinishing a deck is one of the most effective ways to extend its lifespan and transform its appearance without the significant cost of replacement. Over...