Painting Wooden Patio Furniture: DIY Tips & Long-Lasting Stain Ideas
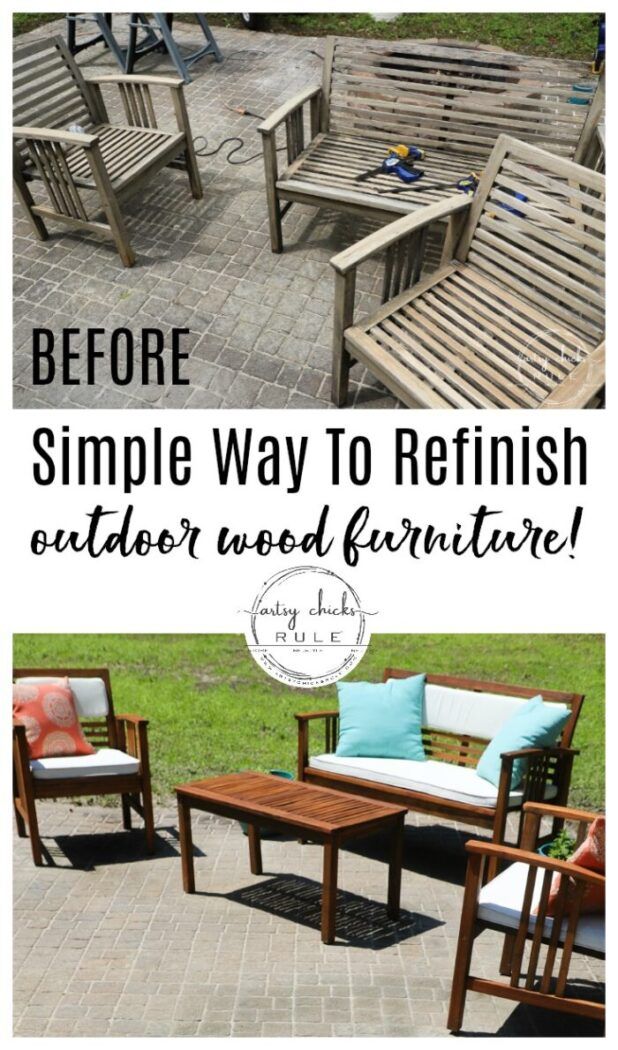
Transforming a worn, weathered wooden patio set into a vibrant focal point is one of the most rewarding DIY projects for any homeowner. Before you begin, it is essential to understand that success lies not in the paint itself, but in the meticulous preparation of the surface. Wood exposed to the elements faces constant challenges from UV radiation, moisture, and temperature fluctuations, which cause the grain to rise and the old finish to deteriorate. Skipping the preparation phase is the single most common reason for peeling and chipping, turning a weekend project into a frustrating repair job. By committing to a methodical process of cleaning, sanding, and priming, you ensure that your new finish adheres perfectly, providing a durable shield against the elements.
The Critical Role of Proper Preparation
While it may seem tedious, the preparation stage is the absolute foundation of a professional-looking result. Think of it as giving your furniture a thorough cleanse and reset before applying any new aesthetic. The primary goal is to create a smooth, clean, and chemically stable surface for the paint to bond to. This involves removing decades of grime, old loose paint, and any traces of previous oils or sealers. A stable base is non-negotiable; without it, even the most expensive paint will fail prematurely as the wood continues to move and degrade underneath.
Deep Cleaning and Sanding Techniques
Start by deep cleaning the furniture with a specialized wood cleaner or a mixture of trisodium phosphate (TSP) to cut through grease and mildew. Rinse thoroughly and allow the wood to dry completely for 48 to 72 hours. Once dry, use a combination of sandpaper grits to smooth the surface. Begin with a coarse 80-grit sandpaper to remove any rough spots or peeling paint, then move to a medium 120-grit to eliminate scratches left by the coarse grit. The final step should be a gentle 180-grit sanding, which smooths the grain without damaging the wood's structure. Always sand along the grain of the wood to avoid creating new scratches that will show through your paint.


Choosing the Right Materials for Outdoor Durability
Not all paints are created equal, and using an interior product outdoors is a guaranteed path to failure. The key to longevity is selecting a formula specifically engineered to handle the rigors of patio life. Two excellent choices are 100% acrylic exterior paint and elastomeric paints. Acrylics offer superior flexibility, allowing the paint to expand and contract with the wood as humidity changes, which prevents cracking. Elastomeric paints are exceptionally thick, filling in imperfections and creating a waterproof, rubberized barrier that sheds water effectively. For best results, pairing your chosen paint with a high-quality exterior-grade primer will significantly improve adhesion and coverage.
Color Selection and Application Tips
When selecting a color palette, consider the existing architecture of your home and the surrounding landscape. Lighter tones reflect heat, keeping the furniture cooler on hot summer days, while darker shades absorb heat, which can be a pleasant bonus in cooler climates. To apply the paint, use a high-quality synthetic bristle brush for detailed work and a short-nap roller for large, flat surfaces like tabletops and backs. Apply the paint in thin, even coats, allowing sufficient drying time between layers as specified by the manufacturer. Applying too much paint at once leads to runs and a thicker film that is more prone to cracking and peeling over time.


Protecting Your Investment
After the final coat of paint has fully cured—which can take up to a week—your hard work deserves an extra layer of defense. While some paints are marketed as "self-priming" or "all-in-one," adding a topcoat significantly extends the life of the finish. A quality exterior polyurethane or water-based deck protector acts as a sacrificial layer, shielding the underlying paint from UV fading, scratches from daily use, and moisture penetration. This final step is what separates a DIY touch-up from a long-lasting, professional-grade renovation that will protect your wooden patio furniture for years to come.


Related Articles

Charming Wooden Furniture Painting Ideas for a Rustic Chic Home
Transforming a tired piece of furniture is one of the most rewarding DIY projects you can undertake, and wooden furniture painting ideas offer endless...

Painting Bedroom Doors: 50+ Stunning Ideas & DIY Tips
Refreshing your bedroom often involves more than swapping out throw pillows or changing the wall color; it can start with the surfaces you interact with daily...

Spray Painting Aluminum Patio Furniture: Ultimate DIY Refresh Guide
Refreshing your outdoor space doesn't always require purchasing new aluminum patio furniture. With a fresh coat of paint, you can transform weathered, fading...

Folk Art Furniture Painting: Rustic Charm & DIY Décor Ideas
Folk art furniture painting is a time-honored tradition that transforms ordinary pieces into vibrant storytellers, breathing new life into weathered wood with...

How to Stain Lips Permanently: Long-Lasting DIY Lip Tint Tips
Staining lips permanently is a goal rooted in the desire for lasting beauty and convenience, freeing one from the daily ritual of reapplying color. Achieving...
Ultimate Guide to Spray Painting Over Rust: Flawless Finish Tips
Finding rust on your metal surfaces can feel like a setback, but it is far from the end of the road. Spray painting over rust is not just a temporary fix; it...