How to Wire a Single Light Switch: Step-by-Step Guide
Wiring a single light switch is a fundamental electrical task that empowers homeowners to take control of their living spaces. Whether you are updating an outdated fixture or adding a new wall switch for improved convenience, understanding the correct procedure is essential for both safety and functionality. This guide walks you through the process step-by-step, ensuring a safe and successful installation.
Before you begin, safety must be your absolute priority. Working with electrical systems involves inherent risks, and failing to respect those risks can lead to severe injury or property damage. You are not just dealing with inconvenience; you are dealing with live current that can cause electrocution or start a fire. Proper preparation is not optional; it is the foundation of the entire project.
Essential Tools and Materials
Success in this task relies heavily on having the right equipment on hand. You should gather everything before turning off the power, avoiding the need to scramble for tools while standing in a dark hallway. A well-prepared project is a safe project, and this stage sets the tone for the work ahead.


Tools You Will Need
- Non-contact voltage tester
- Screwdriver set (flathead and Phillips)
- Wire strippers
- Electrical tape
- Needle-nose pliers
Materials Required
- New single-pole light switch
- Replacement wall plate
- Wire nuts (if connecting multiple wires)
Step One: Cutting the Power
The most critical step in any electrical work is disconnecting the power at the source. You might feel confident flipping a switch to turn off the light, but that action only breaks the load side of the circuit, leaving the hot wire energized. This hidden danger is a common cause of electrical shock during DIY projects.
Locate your home’s main electrical panel and identify the correct circuit breaker. If you are unsure which breaker controls the switch, turn them off one by one and test the light with a non-contact voltage tester. Once identified, flip the breaker to the "Off" position. To ensure the power is truly dead, test the light switch itself with the voltage tester before touching any wires.


Step Two: Accessing the Old Switch
With the power confirmed dead, you can move forward with physical access. Remove the cover plate protecting the switch by unscrewing the small screws located at the top and bottom. These plates are often held on tightly by dust and age, so a firm grip is necessary to prevent them from cracking.
Next, unscrew the switch plate screws and gently pull the switch out of the electrical box. You will immediately see the wiring configuration, which is your map for the installation. Take a moment to photograph the original setup. This visual reference is invaluable if you become confused about where the white and black wires connect.
Step Three: Understanding the Wiring
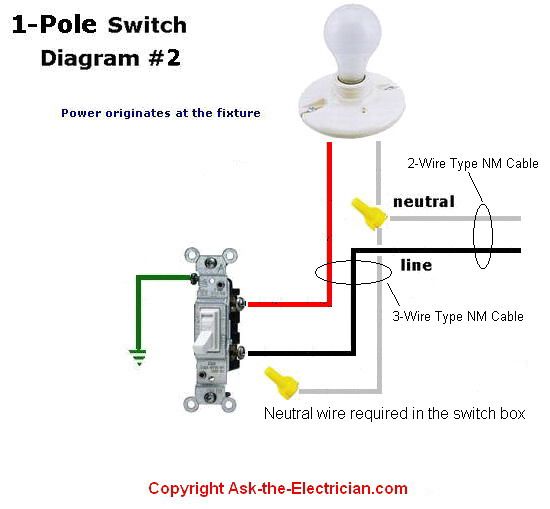
Inside a standard single-pole switch setup, you will typically encounter two types of wires: the hot and the traveler. The black wire, often referred to as the hot or live wire, carries the current from the power source. The white wire, usually marked with black tape or a black stripe, is the neutral return path.


You might also see a copper or green ground wire, which is crucial for safety but is not connected to the switch itself. The switch is designed to interrupt the hot wire (black), not the neutral (white). When you disconnect the old switch, note the position of the black wire, as this is the wire you will replicate on the new device.
Step Four: Connecting the New Switch
This is the moment where the physical work happens. You will wrap the stripped end of the black hot wire around the brass-colored terminal screw on the back of the new switch. The brass terminal is specifically designed to grip the wire securely, providing a reliable connection that won’t work itself loose over time.
After securing the black wire, attach the white neutral wire to the silver terminal. If your safety checks were correct, the power is off, and these wires are not carrying current. Take your time to tighten the screws firmly; a loose connection can arc electricity and create a significant hazard. Once both wires are secured, carefully fold them back into the electrical box and attach the new switch faceplate.




Step Five: Testing the Installation
With the new switch physically installed, it is time to restore power and verify your work. Return to the electrical panel and flip the corresponding circuit breaker back to the "On" position. Once power is restored, test the switch by flipping it up and down. The connected light should turn on and off smoothly without any buzzing or flickering.
If the light does not function as expected, immediately turn the power back off and re-examine your connections. The most common issues are reversed wires or a loose terminal screw. Double-checking your work ensures that your new switch operates safely and reliably for years to come.
Related Articles
How to Wire a Basic Light Switch: Simple Step-by-Step Guide
Wiring a basic light switch is a fundamental skill that empowers homeowners to take control of their living spaces. This seemingly simple task, when done...

How to Wire a Light and Switch Diagram: Easy Step-by-Step Guide
Wiring a light and switch correctly is the foundational skill for any homeowner or DIY enthusiast aiming to tackle basic electrical projects. A proper light...

How to Wire a Headlight Switch: Easy Step-by-Step Guide
Wiring a headlight switch correctly is fundamental for both vehicle safety and DIY automotive competence. A faulty or incorrectly installed switch can lead to...

Red White and Black Wire Light Switch: The Complete Installation Guide
When you see a red white and black wire light switch setup in your home, it typically indicates a more complex wiring configuration than the standard...

Wiring a Light Switch in Series: A Step-by-Step Guide
Wiring a light switch in series is a fundamental electrical technique that connects multiple switches to a single light fixture, allowing control from various...

Wire 3 Lights to One Switch: Easy Step-by-Step Guide
Wiring three lights to one switch is a common electrical project that can enhance the functionality and ambiance of any room. This setup allows a single switch...