How to Patch a Hole in a Brick Wall: DIY Repair Guide
Few things are as jarring as the sight of a hole in an otherwise pristine brick wall. Whether it is the legacy of a removed fixture, accidental damage, or the aftermath of a structural event, an open gap compromises the integrity of your home. Treating this repair as a simple cosmetic fix will only lead to future problems. This guide details the methodical process of patching a hole in a brick wall, ensuring the repair is as durable and visually coherent as the original construction.
Assessing the Scope of the Damage
Before you mix any mortar, it is critical to evaluate the size and nature of the breach. The repair strategy changes significantly based on whether the hole is superficial or penetrates the entire wall thickness. A small indentation affecting only the face veneer can be addressed with a surface render. Conversely, a hole larger than a few inches, or one that exposes the cavity or inner leaf, requires a more structural approach involving backing material.
Measuring and Diagnosing the Structure
Use a ruler to determine the dimensions of the hole. If the wall is double-wythe, check if the inner brick is intact. Gently probe the edges with a screwdriver to test for crumbling or loose aggregate; compromised brick may need replacement rather than just covering. Understanding whether you are dealing with a solid wall or a cavity construction dictates how much filler material is required to restore stability before the final skin is applied.


Gathering Materials and Tools
Successful masonry repair relies on having the right materials for the bond. You cannot simply use generic cement; the mix must be compatible with existing brick. The goal is to match thermal movement and color while ensuring the new compound bonds securely without shrinking or cracking.
- Type N or Type S masonry cement
- Clean masonry sand (if not using pre-mixed mortar)
- Aggregate or specialized patching compound for deep fills
- Wire mesh or fiberglass backing for reinforcement
- Brick trowel, margin trowel, and a stiff brush
Preparing the Breach
A common failure in patching is poor adhesion due to an unclean substrate. Mortar will not bond to loose debris or a dusty surface. The hole must be meticulously prepared to create a mechanical key for the new material.


Start by clearing the void of all dust, loose bricks, and old mortar fragments. If the hole is larger than half an inch, you should undercut the edges slightly—meaning make the opening wider at the base than at the top. This shape prevents the patch from popping out as it cures. For holes exceeding an inch in depth, insert a wire mesh or expanded metal mesh at the back of the hole to act as a stable skeleton for the fill.
The Patching Process
Mix your mortar to a stiff, plastic consistency; it should hold a notch without slumping. If the hole is deep, do not fill it in a single step. Apply a base layer of coarse aggregate or a high-strength filler to bulk out the depth, allowing it to set partially. Only then should you apply the final mortar mix to create the surface texture.
Press the mortar firmly into the prepared hole using your trowel. Ensure that the new brickwork is slightly proud of the surrounding surface. This is necessary because the patch will settle slightly as it cures. Scrape off excess mortar with the edge of your trowel to create a clean joint line that mimics the existing mortar beds.


Matching the Aesthetics
The technical success of the patch is measured by its invisibility. Even a structurally sound repair will stand out if the color and texture clash. Brick color varies significantly based on firing and age, so rely on a physical sample rather than a photograph when selecting your mortar.
After the patch has cured—usually within 48 hours—use a stiff brush to clean off any staining. If the new mortar is darker, you can lightly buff it with fine-grit sandpaper. For a closer color match, consider applying a tinted concrete sealer or a diluted acid wash to tone down the brightness of the new material.
Final Curing and Maintenance
Allow the repaired area to cure slowly. Avoid pointing a fan directly at the patch or exposing it to heavy rain within the first week. Proper curing ensures the crystalline structure of the mortar develops the necessary strength to withstand thermal cycling.

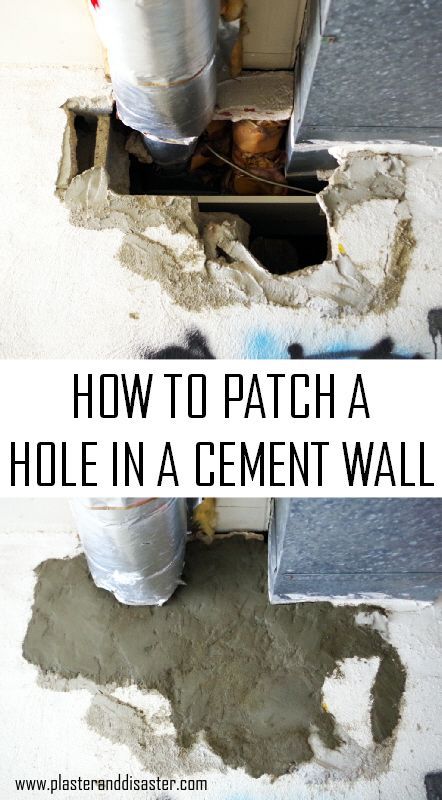


Once the mortar has fully hardened, inspect the joint. Running a finger over the surface should reveal a smooth transition between the old and new work. By treating the repair with the respect it deserves, you ensure the wall remains a functional barrier and an aesthetic asset for years to come.
Related Articles

How to Fix a Hole in Wall Easy: Quick & Simple Repair Guide
Discovering a hole in your wall can be a minor panic, but it is almost always a fix that any homeowner can handle. Whether it is from a stray doorknob, an...

How to Patch a Small Hole in Drywall: Quick & Easy Repair Guide
Patching a small hole in drywall is one of the most common and satisfying DIY tasks for homeowners. Whether it's from a doorknob impact, a misplaced picture...

Ultimate Guide to Patching Holes in Concrete Walls: DIY Tips & Tricks
Discovering a patch hole in concrete wall is a common scenario for both homeowners and commercial property managers. Whether it is the result of a previous...
How to Cover a Hole in the Wall: Quick & Easy Repair Guide
Finding a hole in your wall is an inevitable part of home ownership. Whether it is from a misguided furniture move, an accidental door strike, or a previous...

How to Drill a Hole in Brick Wall: Step-by-Step Guide
Drilling a hole in a brick wall is a fundamental skill for any homeowner or DIY enthusiast, whether you are installing shelves, running cables, or mounting...
Fix a Hole in Drywall with a Patch: Easy DIY Repair Guide
Few things are as frustrating as finding an unexpected hole in your wall. Whether it is from a misplaced doorknob, a wandering piece of furniture, or a playful...