Fold Your Way to Nature: The Ultimate Guide on How to Make an Origami Tree
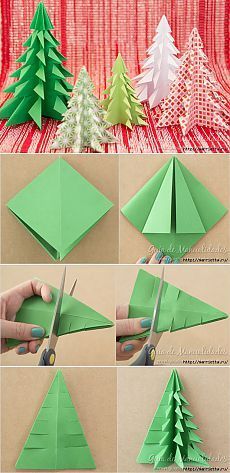
Creating an origami tree is a rewarding exercise that combines precision with artistic expression. This guide walks you through the process of crafting a elegant tree model using a single sheet of square paper. With clear folds and a focus on structure, you will learn to shape the trunk, branches, and foliage with intention.
Selecting the Right Paper
The foundation of any great origami creation begins with the paper. For an origami tree, you want a material that holds creases well and offers a visual texture reminiscent of bark and leaves. Traditional origami paper, or kami, is ideal due to its lightweight yet resilient nature. Choose a color that evokes nature; subtle greens for dense foliage, or earthy tones for a grounded, autumnal feel. If you are practicing the wet-folding technique, consider using specialty damp-resistant paper to allow for curved shaping and more organic forms.
Establishing the Base
Start with your square sheet of paper color-side down if it has a distinct front and back. Fold the paper diagonally in both directions to create an X crease, then fold it horizontally and vertically to create a + crease. Collapse the paper along these lines to form a square base, with the open end facing you. This initial structure provides the radial symmetry needed for the tree to expand uniformly, mimicking the branching pattern found in nature.


Forming the Trunk and Roots
With the open end of the square base facing downward, you will now begin to shape the foundation of the tree. Carefully fold the bottom edges inward to meet the center crease, creating a narrow rectangular shape. This action begins to define the trunk. To add stability and realism, fold the very tip of this rectangle backward to create a small tab, which will later anchor the roots. Gently pull the layers apart to puff out the center, giving the trunk a three-dimensional presence before proceeding to the branches.
Creating the Branch Structure
Now it is time to add the skeletal framework of the tree. Identify the top layer of the model and valley fold the sides inward to create two distinct flaps representing the primary branches. The angle of these folds determines the personality of the tree; acute angles create a dense, shrub-like appearance, while wider angles suggest a spreading canopy. Repeat this process on the reverse side to ensure the branches align symmetrically, maintaining the integrity of the design.


Shaping the Canopy
This is where the model truly begins to resemble a tree. Focus on the flaps you created for the branches and perform a series of petal folds. By folding the top edge of the flap back and then down, you create volume and curvature that mimics leaves catching the wind. Work systematically from the center outward, layering the folds to add depth. The key is to vary the tightness of the folds; tighter folds create dense clusters of leaves, while looser folds allow the branches to appear more open and airy.
Refining the Aesthetic
Once the basic structure is complete, step back and examine your tree. Adjust the angles of the branches to create a dynamic, asymmetrical silhouette rather than a rigid, artificial one. You can curl the edges of the leaves slightly with your fingernails to soften the look and introduce a sense of movement. If you used wet-folding, now is the time to gently shape the trunk and branches, bending them slightly to suggest growth toward a light source.
Display and Preservation
An origami tree is a delicate sculpture that deserves thoughtful presentation. To maintain the integrity of the folds, avoid handling the foliage excessively. If you wish to display it in an open environment, ensure the location is dry and away from direct sunlight to prevent the paper from fading or becoming brittle. For a more permanent arrangement, consider spraying the model lightly with a craft fixative or placing it under a dome glass case. This protects the intricate leaf patterns and allows the piece to serve as a timeless focal point in your space.




Related Articles

Fold Nature: Pine Tree Origami Art & Step-by-Step Guide
The crisp scent of evergreen and the quiet focus required to fold paper—these two elements might seem unrelated, yet they converge beautifully in the art of...

The Ultimate Guide to Folding Underwear to Save Space – Maximize Your Drawer!
Neatly folding underwear is more than a domestic chore; it is a fundamental exercise in wardrobe efficiency. The way you organize your undergarments directly...

The Big Fig Tree: Your Ultimate Guide to Growing a Giant
The fig tree big is an imposing and majestic presence in any landscape, commanding attention with its expansive canopy and gnarled, ancient-looking trunk. This...

Maximize Your Harvest: The Ultimate Guide to Orange Tree Size Growth and Care
The size of an orange tree is a fascinating subject that bridges botany, agriculture, and practical gardening. While the fruit often takes center stage...

Make Your Laptop Lightning Fast: Ultimate Speed Upgrade Guide
When your laptop begins to lag, applications stutter, or boot times stretch into minutes, it can feel like technology is actively working against you. This...

The Ultimate Guide to Chopping Down Your Own Christmas Tree: Tips, Safety & Tradition
The decision to chop down your own Christmas tree transforms a simple holiday chore into a deeply personal ritual. It connects you to the landscape and embeds...