The Ultimate Guide to How Long to Cook Chicken Breasts: Perfectly Juicy Every Time
Understanding how long to cook chicken breasts is essential for both safety and flavor. Undercooked poultry poses health risks, while overcooked breasts become dry and unappetizing. The perfect result requires attention to thickness, cooking method, and temperature, transforming a simple cut into a juicy, satisfying meal.
The Critical Role of Thickness
The single most significant factor determining cook time is the physical dimensions of the breast. A standard, uniform cut typically measures about one inch thick, providing a reliable benchmark for most recipes. Because heat transfers from the outside inward, this thickness dictates the duration needed to bring the center to a safe temperature. Always use a kitchen instant-read thermometer to verify, as oven temperatures and stovetop heat can vary significantly.
Timing for Common Cooking Methods
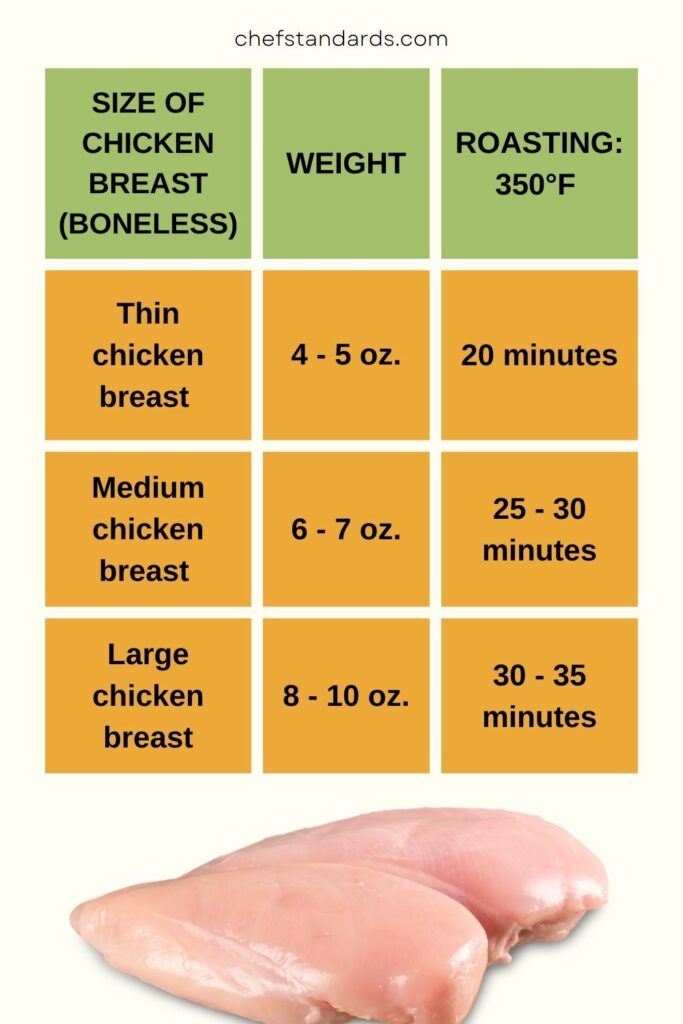
Different techniques apply heat differently, leading to varied results. Here is a breakdown of average timing for a one-inch breast, though you should always confirm with a thermometer.


Oven Roasting
Roasting in a preheated oven at 375°F (190°C) usually requires 20 to 30 minutes. This method promotes even cooking and allows for better moisture retention if you use techniques like brining or covering the breasts with foil for the initial phase.
Stovetop Pan-Searing
For a flavorful sear on the stove, medium-high heat is ideal. You should expect to cook the chicken for 5 to 7 minutes per side. The high temperature quickly browns the exterior while heating the core, creating a delicious crust without sacrificing too much internal juiciness.


Grilling
Grilling over medium heat generally takes 6 to 8 minutes per side. This method adds a distinct smoky char, but it requires vigilance to prevent flare-ups from fat dripping onto the grates. Indirect heat is often beneficial for thicker cuts to ensure the inside cooks through without burning the outside.
The Non-Negotiable Food Safety Standard
While time estimates are helpful, they are irrelevant without confirming the internal temperature. The USDA mandate is that poultry must reach a minimum of 165°F (74°C) measured in the thickest part of the meat. Relying solely on a timer is a gamble; a thin part of the breast might appear done while a thicker section remains raw. Investing in a reliable digital thermometer is the only way to guarantee safety.
Strategies for Moisture Retention
Many home cooks struggle with dry chicken, but the battle can be won through preparation. One effective strategy is brining, which involves soaking the breasts in a saltwater solution for 30 minutes to an hour. This process helps the muscle fibers retain moisture during cooking. Additionally, avoiding high heat for the entire cook time—starting hot for a sear and then finishing at a moderate temperature—can prevent the proteins from squeezing out every drop of juice.


Resting: The Final, Crucial Step
Once the chicken leaves the heat source or oven, it must rest for a minimum of 5 to 10 minutes. During this period, the muscle fibers relax and reabsorb the juices that were pushed to the center. If you slice immediately, those precious liquids will spill onto the cutting board, resulting in dry meat. Allowing the chicken to rest effectively continues the cooking process gently and ensures a succulent bite every time.



Related Articles

The Ultimate Time to Bake Chicken Breast Guide: Perfectly Juicy Every Time
Perfectly cooked chicken breast is the cornerstone of countless healthy meals, yet it remains one of the most challenging proteins for home cooks to master...

The Ultimate Internal Temp to Cook Meatloaf: Perfectly Safe & Juicy Every Time
Preparing the perfect meatloaf starts long before it enters the oven; it begins with understanding the precise internal temperature required for both safety...

The Ultimate Guide to Cooking Fingerling Potatoes: Perfectly Roasted Every Time
Fingerling potatoes, with their elongated shape and vibrant hues, represent a delightful upgrade from the standard Russet. These small, narrow tubers offer a...

Crispy Instant Pot Fried Chicken Breasts in 20 Minutes - Perfectly Juicy Every Time
Perfectly seared on the outside and impossibly juicy on the inside, instant pot fried chicken breasts represent the pinnacle of modern kitchen efficiency. This...

Perfect Chicken Cooking Time Per Pound: Ultimate Guide To Juicy Results
Mastering the art of roasting a whole chicken starts with understanding the foundational principle of cook time: weight. Whether you are preparing a weeknight...

Fast vs Slow Chicken Cooking: The Ultimate Guide to Juicy Perfection
When it comes to preparing the perfect piece of poultry, the question of heat management is paramount. Is it better to cook chicken fast or slow? The answer is...