How to Build a 2x4 Wall: Step-by-Step Guide
Building a 2x4 wall is the fundamental process behind nearly every framed structure in residential construction, from interior partitions to exterior load-bearing walls. This method, known as wood stud framing, provides a strong, versatile, and cost-effective skeleton for your home or workshop. Success hinges on meticulous planning, precise cutting, and adhering to established construction standards to ensure the final wall is both true and structurally sound.
Understanding the Anatomy of a 2x4 Wall
Before you make the first cut, it is essential to understand the components that make up a complete wall assembly. A basic wall consists of a bottom plate, which sits on the subfloor, and a top plate, which caps the structure and connects it to the floor or ceiling above. Vertically spaced between these two horizontal members are the studs, typically spaced 16 inches on center, though 24-inch spacing is sometimes used for non-load-bearing partitions depending on local building codes. These components work together to create a stable platform for sheathing, siding, and interior finishes.
Planning and Measurement
Accuracy is the cornerstone of a well-built wall. Begin by carefully reviewing your construction plans to determine the exact length and height of the wall, as well as the placement of any windows or doors. Transfer these dimensions to the top and bottom plates, marking the stud locations precisely with a pencil. Remember to account for the width of the lumber itself; since a standard 2x4 is actually 1.5 inches thick, you must subtract this measurement from your total wall length to avoid misalignment at the corners. Double-checking these measurements before cutting will save you time and prevent material waste.


Cutting and Assembling the Framework
With your marks in place, proceed to cut the top and bottom plates to size using a circular saw. Layout the plates parallel to each other on a flat, stable surface and position the cut studs vertically between them. It is critical to align the edges of the studs with the pencil marks on the plates to ensure the wall remains perfectly square. Secure each intersection with structural-grade nails or screws, driving at least two fasteners through the bottom plate and into the stud, and two through the top plate. This rigid frame is the backbone of your construction, so ensure every connection is tight and flush.
Addressing Openings for Windows and Doors
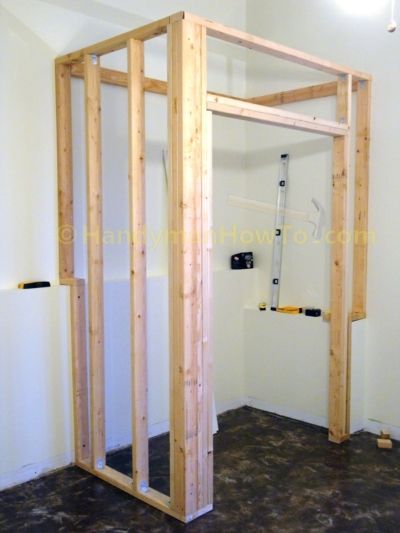
Handling openings requires a specific technique to maintain the wall’s integrity. Unlike a solid wall, you cannot run a full stud uninterrupted over an opening. Instead, you must create a header—a doubled or engineered lumber piece placed above the opening to carry the weight of the wall above it. Cripple studs are then installed vertically between the top plate and the header, and between the header and the bottom plate. Precise measurement of the rough opening—width, height, and total length—is vital to ensure the finished window or door fits correctly within the frame.


Ensuring Squareness and Plumb
A common mistake during assembly is allowing the frame to twist out of shape. To combat this, always lay out the top and bottom plates with the same orientation, and measure the wall diagonally from corner to corner. If the two diagonal measurements are equal, the frame is square. Additionally, use a level to check that the studs are perfectly plumb (vertically straight) as you nail or screw them in place. A square and plumb wall will make the subsequent tasks of sheathing and finishing significantly easier and more accurate.
Handling and Installation
Once the frame is complete, you must manage its considerable weight and dimensions safely. Use a helper to lift the wall into position, ensuring clear communication to avoid injury. Temporarily brace the wall in place with 2x4 spacers nailed to the subfloor to hold it steady. Align the wall with the chalk lines on the subfloor, checking for plumb with your level. Finally, secure the wall to the floor by nailing through the bottom plate and into the subfloor, and connect the top plate to the adjacent structure, effectively locking the wall into the overall frame of the building.
Adhering to Building Codes
Compliance with local building codes is non-negotiable and must be considered at every stage of the project. These regulations dictate the required strength of the wall, the nailing schedule, and the proper installation of fire-blocking in walls of certain heights or types. Furthermore, ensure that the placement of electrical outlets, switches, and plumbing rough-ins aligns with the finished wall layout. Consulting the code book or a local building inspector before you start cutting will prevent costly rework and ensure your wall meets safety standards for a lifetime.




Related Articles

The Ultimate Guide to Building a Bedroom Wall: DIY Tips & Tricks
Building a bedroom wall is a foundational project that transforms a vague idea into a defined space. Whether you are creating a private retreat within a larger...

How to Build a Floating Deck Next to Your House: A Step-by-Step Guide
Building a floating deck next to your house is an excellent way to expand your living space without the complexity of a foundation. This type of deck is called...

Build Your Own Pokemon Scanner: A Step-by-Step Guide
For the dedicated Pokémon enthusiast, the world is filled with possibilities hidden in plain sight. Whether you are strolling through a bustling city park or...

Building Deck Steps Without Stringers: A Step-by-Step Guide
Building deck steps without stringers is a modern approach that simplifies the construction process while offering exceptional durability and a clean...

The Ultimate Guide to Building a Bean Bag Board: Step-by-Step DIY Instructions
There is a distinct satisfaction that comes from engaging with a physical game board, one that translates digital fun into a tangible experience. Building a...

Maximize Space: The Ultimate Guide to Building an Alcove in Wall
An alcove in wall design is more than just a recessed space; it is a deliberate architectural feature that transforms a standard room into a curated...