Add a Bathroom Vent: Improve Air Quality & Prevent Moisture Damage
Adding a vent to your bathroom is one of the most impactful home improvement projects you can undertake for both health and comfort. Without proper airflow, bathrooms become a breeding ground for mold, mildew, and excess humidity, which can damage finishes and even affect your respiratory health. A well-planned venting solution removes stale air, introduces fresh circulation, and protects the integrity of your space. This guide walks you through the essential steps and considerations to execute the project efficiently.
Why Bathroom Ventilation Matters
The primary function of a bathroom vent is to manage moisture levels. Showers and baths release significant amounts of steam into the air, and without an exit route, that moisture condenses on walls, ceilings, and mirrors. Over time, this leads to peeling paint, warped cabinetry, and the growth of black mold, which can be hazardous to your health. Furthermore, a bathroom without adequate ventilation will often carry lingering odors, making the room unpleasant for guests and uncomfortable for daily use.
Choosing the Right Type of Vent
Not all vents are created equal, and selecting the right one depends on your bathroom's layout and your goals. The two main categories are exhaust fans and passive vents. An exhaust fan actively pulls air out using a motor, providing powerful and immediate ventilation. A passive vent, often found in older homes, relies on natural airflow through a grille and a window or trickle vent, which is less effective for steam removal.


Exhaust Fan Specifications
When shopping for an exhaust fan, focus on the CFM (Cubic Feet per Minute) rating. This number indicates the fan's power; a general rule of thumb is to choose a fan capable of cycling the air in your bathroom 8 times per hour. For larger showers or steam rooms, you will need a higher CFM. Additionally, look for features such as built-in humidity sensors, which automatically trigger the fan when steam is detected, and insulated baffles, which prevent heat loss in the winter.
Ideal Locations for Installation
The placement of your vent can make or less effective the system. The most common and efficient location is on the ceiling above the shower or bathtub. This positioning captures rising steam directly at its source before it can spread to other surfaces. If ceiling installation isn't feasible due to joists or plumbing, an inline wall mount is the next best option. Ensure the duct run is as short and straight as possible to maintain strong airflow and minimize condensation buildup inside the walls.


Tools and Materials Needed
Successful installation requires the right tools to ensure a safe and secure setup. You will need to cut holes into drywall, which requires a sturdy utility knife or a drywall saw. A drill with various bits is necessary for securing the fan housing and vent cover. You will also need electrical wiring and a junction box to connect the fan to your home's power supply, along with ductwork and connectors to channel the air outside. If you are not comfortable working with electrical systems, hiring a licensed electrician is the safest route.
The Installation Process Step-by-Step
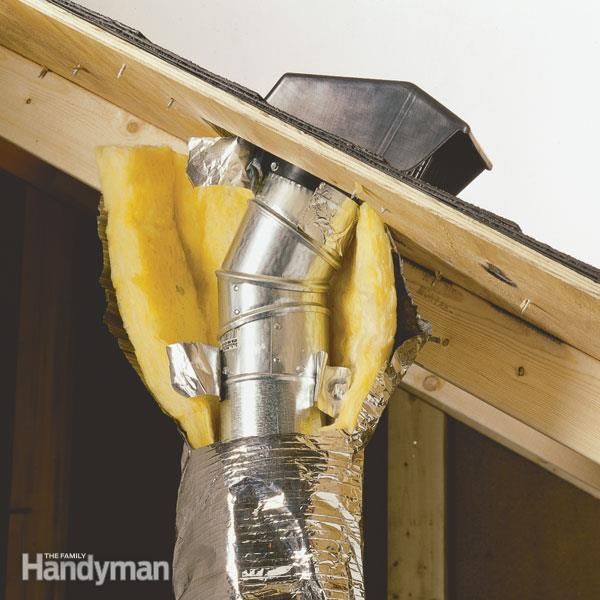
Begin by turning off the power to the bathroom circuit at your home's breaker box for safety. Measure and mark the location for the fan housing on the ceiling, ensuring it aligns with the joists for support. Cut the hole and insert the fan duct, sealing the edges with caulk to prevent air leaks. Secure the fan housing to the ceiling joists, carefully wiring the electrical connections according to the manufacturer's instructions. Once the motor is secured, attach the ductwork leading to an exterior wall or soffit, and finally, snap the decorative cover over the unit.
Maintenance for Longevity
Even the best-installed vent requires regular maintenance to function optimally. The most common issue is dust and lint clogging the fan blades and housing, which drastically reduces power. You should remove the cover every few months to vacuum or wipe down the interior components. If your home experiences high humidity, running the fan for 15 to 20 minutes after showering helps to fully evacuate the moisture. For models with filters, check them seasonally; washable filters should be cleaned to prevent blockages and odors.


Enhancing Comfort and Efficiency
A bathroom vent is more than just a utility; it is a comfort feature that enhances your daily routine. By installing a timer switch, you can ensure the air is cleared long after you leave the room, preventing humidity from returning. For a quieter experience, look for low-sone (Sound Number) fans, which operate without the distracting roar of older models. Upgrading to a modern, efficient unit not only protects your home from moisture damage but also adds a subtle luxury to your everyday hygiene rituals.




Related Articles

Basement Ventilation System: Improve Air Quality & Prevent Moisture
A basement ventilation system is essential for maintaining a healthy and durable environment below ground level. Without proper airflow, basements can...

Fix Drainage Hole in Basement Floor: DIY Solutions & Prevent Moisture Damage
Water seeping into a basement is a persistent problem that can lead to structural damage, mold growth, and poor indoor air quality. While surface water is...

Micro USB Cable Saver: The Ultimate Guide to Prevent Loss & Damage
In the daily hustle of plugging and unplugging, your favorite micro USB cable takes a beating. Bent connectors, frayed wires, and frustratingly broken...

The Ultimate Guide to How to Store Your Shoes: Save Space & Prevent Damage
Shoes are arguably the most overlooked item in our daily routine, taking a beating from weather, pavement, and long days on our feet. Proper shoe storage is...

Best Bathroom Vent Fans at Home Depot – Top Picks for 2024
Walking into a bathroom only to be greeted by a foggy mirror and stale air is a daily frustration easily solved with the right bathroom vent fan. Finding the...

10 Easy Ways to Reduce Moisture in Bathroom的迅速指南
Excess moisture in the bathroom is far more than a minor inconvenience; it is the primary catalyst for a cascade of household problems. From the immediate...